Wednesday, March 7, 2012

'What's That?' Wednesday: Coffee (Part 1)

For the next few 'What's That?' Wednesdays, I decided to write about COFFEE!  My Mom LOVES coffee and drinks it every day, so I thought it would be fun to know where it comes from and how it's made.

This week, I wanted to find out about coffee flavor varieties, and what's different about them, but first, enjoy these fun musical videos about coffee:


Muppets version:


Frank Sinatra version:

There is a lot of coffee out there!  Many coffees come from:  Brazil, Tanzania, Jamaica, Hawaii, Papua New Guinea, Rwanda, Cameroon, Indonesia, Ethiopia, Costa Rica, South Africa, India, Kenya and all over Latin America.

The main varieties of coffee include:
  • Arabica - the best flavored coffee (Java and Mocha)
  • Robusta - higher in caffeine and is bitter and more acidic (This is the kind you will find that most people and restaurants serve).
Have you ever been to a coffee shop?  What one have you been to?  What's your favorite kind of coffee?  Do you even understand what you're ordering?  This is the most complicated order from a customer at Starbucks:

“Yes hi I’ll have a tall half-skinny half-1 percent extra hot split quad shot (two shots decaf, two shots regular) latte with whip.”

Next week I'll try to explain what some of those things are.  I have to learn it all, myself, first.  See ya next week!

Have a nice day!

Monday, March 5, 2012

Monday's Munchies: Pizza Pinwheels

I'm feeling better, so Mom let me make some Pizza Pinwheels.  Here's how I made them:


Ingredients:
1 can (8 oz) Pillsbury refrigerated crescent dinner rolls
2 tablespoons grated Parmesan cheese
1/3 cup finely chopped pepperoni (about 1 1/2 oz)
2 tablespoons finely chopped green bell pepper
1/2 cup shredded Italian cheese blend (2 oz)
1/2 cup pizza sauce (from 8-oz can)


1. Heat oven to 350°F. Spray cookie sheet with cookie spray. 

2. Unroll dough; separate dough into 4 rectangles. Firmly press perforations to seal. 


3. Sprinkle Parmesan cheese, pepperoni, bell pepper and Italian cheese blend over each rectangle. 

 Chopping the pepperoni and peppers...with really sharp knives!
Be careful if you do this, it's dangerous.  My Mom was watching me just to be sure I was doing it right.


4. Starting with one short side down, roll up each rectangle; press edge to seal. With serrated knife, cut each roll into 6 slices; place cut side down on cookie sheet. 


5. Bake 13 to 17 minutes or until edges are golden brown. Meanwhile, heat pizza sauce. Immediately remove pinwheels from cookie sheet. 


6.  Serve warm with warm pizza sauce for dipping.

Yummy!!  These didn't last long!  =)

Saturday, March 3, 2012

Messages from Mom: My sick little girl =(

Hi Everyone,

This is Hannah's Mom, Kim. I just wanted to let you know that Hannah has been very sick this past week so she hasn't been able to cook, let alone blog. She's starting to feel a little better and should be able to whip something special up for a new post soon. Be on the lookout for a new post on Monday evening! Please forgive the delay and thanks for visiting her blog. I appreciate your support for her, and I know she is encouraged by your messages and interest in what she's doing.

Have a blessed day!
Kim

Psalm 19:14  "May the words of my mouth and the meditation of my heart be pleasing in your sight, O LORD, my Rock and my Redeemer."


Friday, February 24, 2012

Family Fridays: Tacos

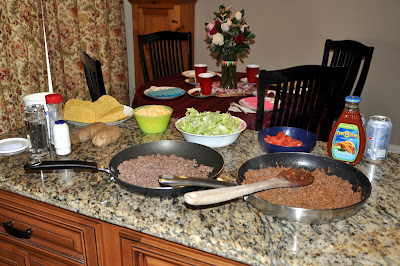
Our Taco Dinner

Tonight we had tacos...well, except for my brother.  He doesn't like them.   The meal was like a buffet, I made everything and set it up on the island, and each of us made our own plates up.

First, I started cooking the ground beef.  I had two pans of it.  One pan was going to be taco meat, and the other was just plain ground meat for my brother.

While the meat was browning, I cleaned the lettuce, got the cheese, tomatoes, sauce, taco shells and other taco toppings ready.


While the meat was cooking, I also set the table.  I kept it simple, using Moms roses for the center piece with a vase that I decorated.  I made menus for everyone also which they loved.  The only item on the menu was what they were going to have for supper.  Ha ha


 Toppings (plus baked potatoes for my brother)

When dinner was ready, I called everyone to the kitchen and they made up their plates.  It was VERY yummy, and I think it was the best meal I've made for my family so far!


 Mom's taco salad

Dad's tacos

My tacos (kind of plain)

My brother's MONSTER meal!  Potatoes, beef, cheese, sour cream and bacon bits!  
He ate it all!!!

Thanks for visiting my blog again.  I'm not sure what I'll make for next Friday, but you'll find out soon enough.

Wednesday, February 22, 2012

'What's That?' Wednesday: Ovens

I'm going to talk about a 'hot' topic today...OVENS!


DUTCH OVENS:
These ovens are usually made of heavy cast iron or aluminum.  The first photo shows a dutch oven that can be used on your stove top or in your oven.  The second photo shows an outdoor dutch oven.  Most of the time they have 3 legs so they can stand over a hot fire, but this one hangs.  You can cook almost anything in these ovens!

  
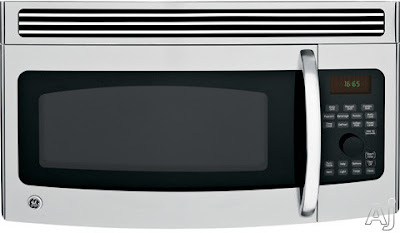
MICROWAVE OVENS:
Almost every home has one of these.  They are quick and easy to use.  They're great for reheating food, cooking popcorn, making hot beverages and more.  "Microwave ovens are electrically operated ovens using high-frequency electromagnetic waves that penetrate food, causing its molecules to vibrate and generate heat within the food to cook it very quickly."

Some important tips on microwaves:
  • Follow safety steps written in your instruction manual.
  • Don't use it if the door does not close properly.
  • Do NOT stand in front of it while it is on.
  • Don't slam the door!
  • Don't heat liquids up for too long.  They can 'explode' when you take them out and you can get burned.


MULTIFUNCTION OVENS:
These ovens look like normal ovens, but you can do several things at once on the same appliance.  They usually have more than 1 oven and you can set set each one at a different temperature.  This is great for cooking 2 different things at the same time that need 2 different temperatures.


BRICK OVENS:
These ovens look fun and are mostly used outdoors.  You better be patient if you cook in one of these, it takes a long time to heat up the oven, and then when it's hot, you need to let it cool down a bit so the temperature is even throughout the oven.  Some things you can cook in these ovens are:  pizza, stews, casseroles, bread, sweet tarts and pies.


CONVECTION OVENS:
These ovens cook with fans.  The fan blows the hot air constantly around the inside of the oven, cooking the food more evenly.  These ovens are usually more expensive than a normal oven.  They save you time and energy because they usually cook faster too.  Other benefits:  retains the flavor of your food, you can cook more at once and you can broil foods in them.  They come in counter top models, or large oven models.

PIZZA OVENS:
These ovens in the pictures below are a modern version of the old pizza ovens.  They are electric and don't need wood fires to heat them up.  Most pizza ovens were made of brick until now.


DOMESTIC OVENS:
This is your basic home oven.  It has a stove top with burners of different sizes on the top.  It's got knobs or buttons to change the temperature/time etc. and it has one or two large ovens.  The first picture is a professional model, and the second picture is your basic model...but in a pretty pink!   I'd love to combine them both and have a large professional pink oven!!


SOLAR OVENS:
These work well on sunny days.  If it's cloudy outside, maybe you should just make a sandwich.  "Solar energy is reflected into the cavity of the oven and a glass door or lid keeps the heat in allowing the temperature to rise quite rapidly." You can cook anything you can in a regular oven in these with the same cook times.  The downside...cloudy days and having to move the oven every 30 minutes to follow the sun.


TOASTER OVENS:
These ovens are small counter top ovens.  You can use them for toasting, cooking, baking, reheating and more.  I like to reheat pizza in our toaster oven.  It comes out a little crispy, not soggy like it would if you microwaved it.


EASY BAKE OVENS:
These are the most fun ovens to use!  The original oven came out in 1963 and used 2 100 watt candescent light bulbs to heat the food.  The newer versions have a stove top and heating elements.  I had one that looks similar to the first photo, but my Mom's looked more like the 2nd photo.


So, what oven do you like to use?  I like the brick ovens the best.  I'd love to cook a pizza in one of those!


Monday, February 20, 2012

Monday's Munchies : Chocolate Chip Cake

Today I am going to show you how to make Chocolate Chip Cake!!


Ingredients:
2 cups all purpose flour
1 teaspoon salt
1 tablespoon baking powder
3/4 cup shortening 
1 1/2 cups sugar
1 1/2 teaspoons vanilla
1 cup milk 
5 egg whites
2/3 cup chocolate chips (semi-sweet)

Pre-heat oven to 375° degrees. 

Grease and lightly flour two 9 x 1 1/2 inch round baking pans.

Combine flour, baking powder, and salt in a bowl. In a separate bowl beat shortening on medium speed of electric mixer about 30 seconds. Add sugar and vanilla and beat until fluffy. Add dry ingredients (flour, baking powder, and salt mixture) and milk alternately to beaten mixture, beating on low speed after each addition. Wash beaters. 

In a small bowl beat egg whites until stiff peaks form. Gently fold (stir) into flour mixture. Pour half the batter into a separate bowl of batter into the two prepared pans, spreading batter evenly. Sprinkle 1/3 cup chips over top of batter in each pan. Pour 2nd bowl of batter on top of chocolate ships in each pan, spreading evenly. Sprinkle remaining 1/3 cup chocolate ships over top of batter in both pans. 

Bake in 375° degree oven for about 20 minutes or until cake tests done. Cool 10 minutes on wire rack. Remove cake from pans. Cool about 30 minutes or until cake is cool to the touch. 

To top it off, I made a simple chocolate buttercream frosting. I added it between the two layers of cake, and then frosted the entire outside.  It was SO good, but very sweet!

If you like chocolate, this cake is for you!!
Enjoy!


Friday, February 17, 2012

Family Fridays: Ziti, Bread & Cake

This week, I made baked Ziti and cheesy garlic bread for dinner, and carrot cake for dessert.

I started cooking the Ziti noodles on the stove.  Once they were cooked and rinsed, I poured the sauce in and added Mozzarella, Parmesan, and Ricotta cheeses and spice.

 Adding the sauce

Adding the cheeses

I just dumped a whole bunch of it in, it was easier.

Almost read to mix...

I added some 'secret' spices to the recipe.

Adding the ricotta cheese

Once all the ingredients were in the pot, I mixed them together.  It was very heavy so it was hard to mix, but I did it.


After it was all mixed, I shoveled it into the pan so I could put it in the oven for 45 minutes to bake.


Finally ready for the oven!

After it came out of the oven, it smelled delicious!  =)  While it was cooking, I made the cheesy garlic bread and set the table.
All ready to eat!

Yummy!

Dinner's ready!

Cheesy Garlic Bread

After dinner, I served the carrot cake.  I baked it on Thursday afternoon and frosted it today.  I added sprinkles to add some pretty color.

Me, holding the carrot cake.

Cream cheese frosting with pink sprinkles

Carrot cake with raisins and carrot chunks.

Everyone loved the meal.  Only my parents ate the cake because I don't like that kind and my brother doesn't like desserts that have veggies in it.  ha ha!