Monday, January 30, 2012

Monday's Munchies: Beach Treats

This delicious treat is great for birthday parties, having friends over, or any other time.  I enjoyed making these with my Mom! Eating them was fun, they were awesome...sand never tasted so yummy! 

 
Topper ingredients:                                                              
1 cup graham-cracker crumbs                                                      
4 tablespoons melted butter                                                   
1/4 cup powdered sugar
AirHead Xtremes candy
Store-bought pound cake
Gel tube icing
Sprinkles

Tools:
Bowl & Spoon
Knife
Kitchen scissors
Kitchen tweezers

1. Spoon your favorite pudding flavor in a glass dish (or other similar type of dish for one serving)
2. Mix graham-cracker crumbs, butter, and powdered sugar in bowl to make your sand.
3. Spoon sand over the pudding. Cut 2 pieces of AirHeads Xtremes for towel.  Fringe ends.  Lay towel on sand.
4. Cut flip-flop shapes from the cake slices. Make straps with gel icing. Add sprinkles and other decorations you desire. Place on treat.
5. Close your eyes while you eat it, and pretend you are on vacation on the beach!  Enjoy!! 

 Our fun creations

Friday, January 27, 2012

Family Fridays: Soup & Grilled Cheese


This week we had grilled cheese sandwiches & soup...easy peasy lemon squeezy!   =)

I asked everyone what they wanted to have on their sandwich and what kind of soup they'd like.  The sandwiches included: turkey, bacon, bologna and American cheese...not all on one sandwich though.

The sandwiches were put together then flipped on the griddle.  When they were done, they were cut in half and placed on a plate.  They smelled delicious.

The soup was easy to do, simply heat and put in a bowl.  I enjoyed doing this for our Friday meal.  It was an easy night!  I also enjoyed setting the table and making drinks for everyone too.


Thursday, January 26, 2012

'Sweet' Thoughts - Peanut Butter Bars

I decided to add 'Sweet' Thoughts to my posts, but they will be added randomly.  When I bake something extra, I will add it to my blog posts if it comes out good and is yummy enough to share.  


Ingredients:                                                                             
1/2 cup butter, softened                                
1/2 cup sugar
1/2 cup packed brown sugar
1/2 cup creamy peanut butter
1 egg
1 teaspoon vanilla extract
1 cup all-purpose flour
1/2 cup quick-cooking oats
1 teaspoon baking soda
1/4 teaspoon salt
1 cup (6 ounces) semisweet chocolate chips

Icing
1/2 cup confectioners' sugar
2 tablespoons creamy peanut butter
2 tablespoons milk

1. In a large mixing bowl, cream the butter, sugars and peanut butter until light and fluffy.  Beat in egg and vanilla.  Combine the flour, oats, baking soda and salt; stir into the creamed mixture.  Spread into a greased 13-in. x 9-in. x 2in. baking pan.  Sprinkle with chocolate chips.

2.  Bake at 350° for 20-25 minutes or until lightly browned.  Cool on wire rack for 10 minutes.  Combine icing ingredients; drizzle over the top.  Cool completely.  Cut into bars.

Serve with love. 


These are VERY yummy, especially if you like peanut butter and chocolate. They only lasted 2 days in my house!! 

Wednesday, January 25, 2012

'What's That?' Wednesday: 5 Cool Tools for the Kitchen

Banana Slicer:

Peel the banana, then press the top of the gadget down.  It slices your banana for you.  I love the shape of this and would definitely use it! 

Cupcake Corer

This tool can make a perfect hole in your cupcake or muffin, so you can add filling to the middle for some flavor.  This is definitely an easy way to fill your cupcake.  I wish I had one!

Tea for Two:
This teapot is for 2 people.  It can hold 2 different types of tea at the same time.  This looks really fun to use.  A great item for tea lovers!!
Clear Toaster:

This toaster is really modern because both sides are made of clear glass.  It's great though, because you can watch to see how dark you want your bread toasted.  It's strange looking, but pretty cool at the same time.

Waffle Trees:


This is a waffle maker that creates tree shaped waffles that you put on sticks.  It's almost like eating a Popsicle for breakfast!  Simply pour on the batter and insert the stick before it's fully cooked.  I'd love to have one of these in my kitchen!!

These gadgets can be fun to use in your kitchen.  Next week I will show you some of the gadgets that we use in our own kitchen.  None of them are quite as strange as these though.

Monday, January 23, 2012

Monday's Munchies: Frozen Fruit Cups


Even though it's winter, these are one of the best snacks to have.  They're healthy because they have lots of fruit in them.  I got the recipe from the American Girl "Molly's Cooking Studio" book.  I love American Girl Dolls!!

Ingredients:
  • 1 cup of orange juice
  • 15 ounce can of crushed pineapple in it's own juice
  • 7 ounce can of mandarin oranges
  • 1 pint of strawberries
  • 2 bananas
  • 1 1/2 cups of ginger ale (use diet if you need to)

Other things you'll need:

  • measuring cup with spout
  • large mixing bowl
  • can opener
  • knife
  • cutting board
  • mixing spoon
  • 5 ounce paper drinking cups (we used large plastic ones!)
  • plastic wrap

The process: 
  • Measure the orange juice into the mixing bowl.
  • Open the cans of crushed pineapple and mandarin oranges.
  • Add the pineapple and its juice to the mixing bowl.
  • Drain the juice from the mandarin oranges into the sink. Cut the mandarin oranges into small pieces and add them to the mixing bowl.
  • Wash the strawberries. Use the knife to remove the stems and cut the strawberries into small pieces. Add the strawberries to the mixing bowl.
  • Peel the bananas and cut them into small pieces. Add the bananas to the mixing bowl.
  • Stir the fruits and juices together, and then stir in the ginger ale.
  • Dip the measuring cup into the mixing bowl. Fill the measuring cup with the fruit mixture. Pour the fruit mixture into the cups.
  • Cover the top of each cup with plastic wrap.
  • Put the cups into the freezer for several hours or overnight.
  • Enjoy!!!

Tall plastic cups work best.
Yummy!  Tastes like summer!!!
These are great for parties because they are easy to pick up and eat.  The colors are so pretty too!

Friday, January 20, 2012

Family Fridays: Pizza & Garlic Bread


Dinner tonight was homemade pizza and garlic bread.  I put the dough in the oven to rise, then spread it on the pans with my hands, put on the toppings and baked them in the oven.  I made 4 personal pizzas for my family. 


I also made 2 kinds of bread.  One was garlic bread with butter, and the other was cheesy bread.  Yum! 


I had fun making dinner tonight, even though the dough had a funny feel to it.  For my table decorations, I put out candles, homemade place mats (made of paper and rubber stamps), and a pretty table cloth. Can't wait until next Friday.  Does anyone have ideas for me?  Leave me a comment if you do.  Thanks!

Wednesday, January 18, 2012

'What's That?' Wednesday: My kitchen


 Welcome to my kitchen, well not MY kitchen, but the one I use at home.  I enjoy spending time here experimenting with food, while learning how to cook and bake.  My favorite part of the kitchen is the baking cabinet, which is filled with all sorts of baking supplies. 

Little by little, my parents are letting me cook on my own.  They (and my big brother) enjoy the foods I make, especially every Friday when I cook dinner for them!


The center island is great for spreading out my supplies, and the granite top makes it easy to roll out dough when I need it.  It's easy to clean when I'm done...but that's not my favorite thing to do!

Monday, January 16, 2012

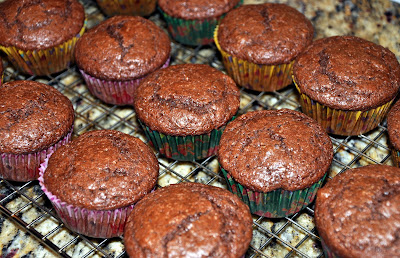
Monday's Munchies: Chocolate Muffins

Chocolate Muffins


Ingredients:

1 3/4 cups all purpose flour
1 cup sugar
1/2 cup unsweetened cocoa powder
2 teaspoons baking powder
1/4 teaspoon baking soda
1/4 teaspoon salt
2 large eggs, lightly beaten
1 cup milk
1/2 cup (1 stick) butter, melted 
1/2 cup chocolate chips, optional
    
1. Preheat oven to 375ºF.  Grease (or line with paper cupcake liners) a 12 cup muffin pan.

2.  Combine the flour, sugar, cocoa, baking powder, baking soda and salt in a medium bowl.  Whisk to blend.

3.  Add the eggs, milk and melted butter. Stir until just blended. Stir in the chocolate chips. Spoon into the prepared pan. Bake until puffed and a toothpick inserted in center comes out clean; 18 to 20 minutes. Transfer to wire rack and cool 5 minutes. Invert and cool completely. Makes 12 muffins.


I enjoyed baking them and eating them. If anyone likes chocolate, they will love these! They are easy and fun to make. 

Saturday, January 14, 2012

Welcome

Welcome to my kitchen! 
I'm Hannah and I'm a 10 year old homeschooler, currently in 5th grade.


I'm so excited to start my own cooking blog.  I hope you enjoy it and will share it with your friends.  Please come visit my blog often and leave me comments, I'd love to hear from you!  I'm going to include some fun things on my blog each week... 

Main topics will include:

"Monday's Munchies" - this section will include recipes, fun snack ideas and more. 

"What's That? Wednesdays" - this section will include information on kitchen gadgets, food products and other interesting facts. 

"Family Fridays" - in this section, I will share with you what I plan to cook for dinner each Friday for my family.  I will also talk about how I decorated the table and share photos with you.

Thank you,